Doug Hercules (dhercjr on drupal.org) is a graduate of the 2012 class of the DrupalEasy Career Starter Program and currently working as an intern with DrupalEasy.
This week I was tasked with learning how to automatically close comments on a node two weeks after the node is created. We initially looked into a couple modules that did this well, Comment closer and Comment commander, but since neither is quite ready for Drupal 7, we decided this would be a good opportunity for me to learn more about the Rules module. Maintained by Wolfgang Ziegler (fago) and Klaus Purer (klausi), this module allows you to define actions that are triggered automatically on various Drupal events as they occur. This blog post will walk you through how I accomplished this task.
Drupalize.me has a great video in their “Learning the Rules Framework Series” called Introducing Rules Scheduler (currently free!) that provided the basic framework for this task. This video was invaluable in getting me up to speed with basic rules functionality.
The first thing I needed to do was download and install Rules. I enabled the Rules, Rules UI and Rules Scheduler module, which required me to also download and enable the Entity tokens and Entity API modules.
Rules Scheduler works with Rules components only, and allows us to schedule an evaluation of rules components; not executing them instantly, but later at a predetermined time. So I began by creating a rules component, which is an individual set of Rules configuration that can be implemented by a Rule, as well as other modules on your site. To get started, on the main Rules Component page (admin/config/workflow/rules/components), I clicked to “+ Add new component”. I wanted my component to actually remove the comment ability to the node (an “action”), so in the “Component plugin” box I chose “Action set” and Clicked “Continue”. In the next screen, in the “Name” box, I typed “Close comments on a node”. The Variables section at the bottom of the page then looked like this,
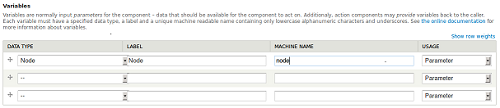
I entered the following; DATA TYPE: Node, LABEL: Node, MACHINE NAME: node, USAGE: Parameter, and clicked “Continue”. I wanted this component to perform on a certain node, so I chose Parameter. A parameter is a variable that is given a specific value when the Rule is performed, it receives the specific node parameters as input and then sets the variables as an output to the component.
Next, I needed to create an action that would close comments. I did this by clicking “+ Add action”, and then in the “Select the action to add” box, I chose “set a data value”. Then in the DATA section “Data selector”’ box, I selected “node:comment” because that’s what I wanted my action to impact and clicked “Continue”. To enter a VALUE, I typed “1” in the Value box (This is just a integer; 0 meaning hidden, 1 meaning it’s closed and 2 it’s open), and clicked “Save” to save my new component. On its own, the component does nothing. It is only once I create a rule that utilizes the component will anything actually happen.
The next step is to create a 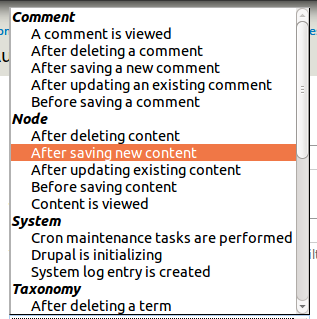 rule to wait 2 weeks after my node is created, and then run the component. To do this I went to - admin/config/workflow/rules and Clicked “+ Add new rule”. In the “Name” box, I typed “actions when new articles are posted” and in the ‘React on event’ box I chose “After saving new content” and Clicked “Save”. There are many options that look similar so be sure to select this one.
I then realized I wanted this to occur not only to new stuff, but whenever I modify existing stuff as well, so I Clicked “+ Add event”, and in the “React on event” box I chose “After updating existing content” and Clicked “Add”. The key is, that in either case (new or existing content), I only want the component to be scheduled if the article is published. I’ll set this up in a later step.
In the Conditions section I Clicked “+ Add condition” and in the “Select the condition to add” box, I chose “content is of type”. Then in the CONTENT section “Data selector” box, I selected “node”. In the CONTENT TYPES section you can select all of the types that you want the comments to close after 2 weeks, in the “Value” box and I Clicked “Save”. For this exercise, I just selected “article”.
To ensure the article is published before the 2 week countdown starts, in the Conditions section, again I Clicked “+ Add condition” and in the “Select the condition to add” box, I chose “content is published”. Then in the CONTENT section “Data selector” box, I selected “node” and Clicked “Save”.
Now to schedule the component to run. In the Actions section, I Clicked “+ Add action” and in the “Select the action to add” box, I chose “schedule component evaluation”. In the COMPONENT section I chose “Close comments on a node” in the “Value” box and Clicked “Continue”. In the SCHEDULED EVALUATION DATE section, I typed “+2 weeks” in the “Value” box (For a good test to make sure you’ve done everything right, you can type “+2 minutes” to make sure it works).
The identifier is what differentiates one task from the other, so in the IDENTIFIER section, I typed “ close comments for node [node:nid] “ in the “Value” box so we only have one comment closing for each mode, and lastly, in the NODE section Data selector box, I chose “node” to send the node variable of the node being saved to the rules component and Clicked “Save”. Therefore, the Rule takes this node and passes it into the component as the node parameter, these nodes and parameters gets saved, and are then loaded when the component is executed.
Now if you did the “+2 minutes” test, you can add an article to your site, and verify the comment capability on the new node. Wait for 2 minutes, refresh your screen and see that the comment capability is gone. Once confirmed, don’t forget to go back in and edit your rule to “+2 weeks” or you won’t be getting too many comments on your site!
I’ve gone ahead and exported both the rule component and the rule for you to check out. First to import the component, go to admin/config/workflow/rules/components and paste the following rule component export into your import page.
{ "rules_close_comments_on_a_node" : {
    "LABEL" : "Close comments on a node",
    "PLUGIN" : "action set",
    "REQUIRES" : [ "rules" ],
    "USES VARIABLES" : { "node" : { "label" : "Node", "type" : "node" } },
    "ACTION SET" : [ { "data_set" : { "data" : [ "node:comment" ],
      "value" : "1" } } ]
  }
}
Similarly for the rule, from admin/config/workflow/rules, import the following:
{ "rules_actions_when_new_articles_are_posted1" : {
    "LABEL" : "actions when new articles are posted",
    "PLUGIN" : "reaction rule",
    "REQUIRES" : [ "rules", "rules_scheduler" ],
    "ON" : [ "node_insert" ],
    "IF" : [
      { "node_is_of_type" : { "node" : [ "node" ],
        "type" : { "value" : { "article" : "article" } } } },
      { "node_is_published" : { "node" : [ "node" ] } }
    ],
    "DO" : [
      { "schedule" : {
          "component" : "rules_close_comments_on_a_node",
          "date" : "+2 weeks",
          "identifier" : "close comments for node {node:nid}",
          "param_node" : [ "node" ]
        }
      }
    ]
  }
}
and there ya go, a new component and rule in under a minute! I hope that at least sparks your curiosity into Rules.