The Flag module is one of those modules that in its previous incarnation (as the Views Bookmarks module) was a bit inflexible and often (at least in my cases) required some manual tweaking of the code to get it to do exactly what I wanted (no offense to the original authors, I actually used it a surprising number of times).
The updated and renamed module is a breath of fresh air - it is an ease to install and configure for any number of use cases - in this article, I'll demonstrate how you can set up a list of the best comments on your site.
The Flag module is extremely useful mainly due to its excellent integration with other Drupal modules - specifically Views and Actions (part of Drupal 6 core). It's also chock-full of AJAX-y goodness (flagging items doesn't require a full page refresh) and a plethora of configuration options.
Installation
When you first install and enable the module, the first thing you'll notice is that there's a new "Flag" option in the Administer|Site Building menu. This is the main control panel for your flags. The Flag module allows to you define an unlimited number of flags for your site. For example, you can set up a flag for users to mark their favorite comments, their favorite blog posts, or their favorite photos. Then, using Views, you can create lists of things that your users have flagged.
By default upon installation, the Flag module creates a "bookmarks" flag that can be used by each user to create a list of their favorite content (nodes) on the site. It also creates a couple of default views to help in displaying the bookmarks as well as a "My Bookmarks" menu item.
Making a list of the best comments
In this example, I'm going to create a global list that only a specific role can add or remove comments from. Imagine that your site has a select group of users ("superusers") that you trust to pick out the best comments on the site. You'll want to set up a "superuser" role on admin/user/roles if you're playing along at home.
Let's start out by clicking the "Add" tab on the main Flag administration page. Name the flag "best_comments" and choose "comments" as the "Flag type":
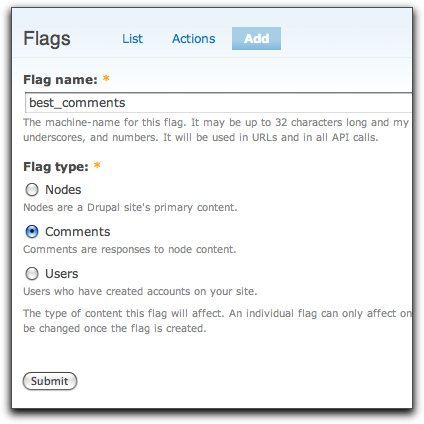
After you click the "submit" button, the "Add new flag" page can be rather intimidating with its many text fields. Looking closely at the form, you'll see that there's only a few required fields - the rest are options that you can check out further once you're comfortable with the required fields. In our case, we're only going to add the following options:
- Title
- Best Comments
- Flag link text
- Flag as Best Comment
- Unflag link text
- Unflag as Best Comment
- Global flag
- checked
- Roles that may use this flag
- superuser
- What nodes this flag may be used on
- Page, Story
The "Global flag" option is a fairly powerful feature of the module - when selected, all users effectively share the flag. That is, only a single list of flagged items is created when this option is selected. When it is not selected, each user will have their own list of flagged items.
The "Roles that may use this flag" option allows you to select which user roles can choose the "best" comments.
At this point, you can set your superusers loose and have them start flagging content. When you navigate to a story or page on your site with a comment, you'll see a new "Flag as Best Comment" link under each comment (assuming you're a superuser):
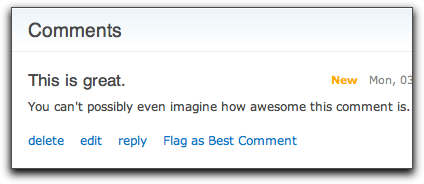
Clicking on the link will unleash the AJAX-y magic that flags the comment. Feel free to go ahead and flag a bunch of comments in preparation for the next step.
(imagine the Jeopardy theme song here)
At this point, you have a bunch of comments that are flagged, but no way to view a list of them. See what I did there? I used the word "view". Clever, I know (okay, not really). Let's go ahead and create a new view to display our list of flagged comments. Head on over to admin/build/views/add and enter the following information:
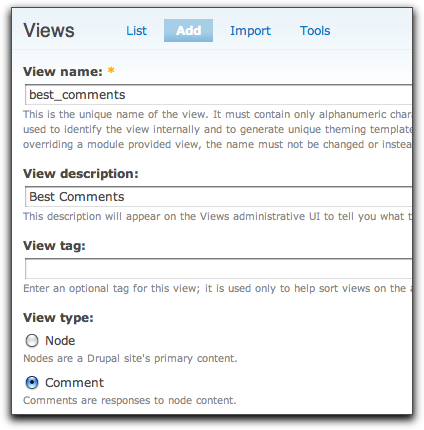
For me, this is kind of exciting: creating a view that isn't based on nodes, but on comments. Up until Views 2 was released, this was just a dream (like flying cars and hoverboards). Anyway, I'm going to assume that you know the basics of setting up a view, so I'm going to focus on the Flag-related bits. A view can be configured to show flagged content via a Flag relationship. So, click to add a new relationship:
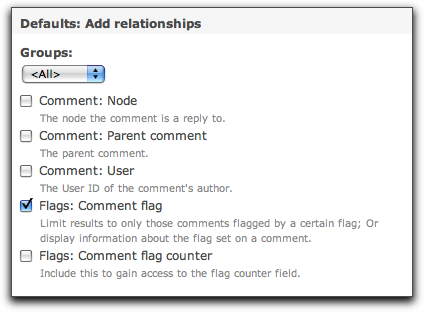
Be sure to label the relationship something meaningful - if you don't, and you're using multiple relationships, things can get confusing fast. Since we only have a single flag set up, the configuration is fairly simple:
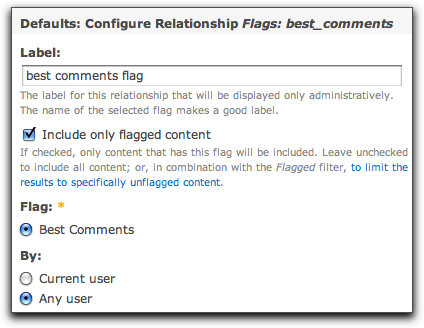
The "Include only flagged content" option acts as a filter - you'll want to be careful using this if your view is using multiple relationships, but for this example, it's not a problem.
At this point, the Flag-related work on the view is complete. You can go ahead and tweak your view to your heart's content. I've added an export of my view to this article if you're interested.
One quick caveat: Views 6.x-2.3 has a known bug that incorrectly renders the comment link. Be sure to use either the 6.x-2.x-dev version from 2009-Feb-26 (or later). Once Views 6.x-2.4 comes out, this will be a non-issue.
It is easy to imagine other uses for this module - it would be trivial to create a "worst comments" flag and view. You could set up a "my favorite comments" flag for each user (by not selecting the "global" option). You can even use it to create buddylists - simply select the "Flag type" as "Users" when creating a new flag and take advantage of the "Flag actions" module (included with the main "Flag" module) to automatically email users when they've been added to somebody's buddy list.
Once you're comfortable with the process of creating a new flag, you'll definitely want to check out the other options on the add/edit flag configuration page. You'll find that you can add a confirmation page to the flagging process as well as a message that appears under the flag links ("thanks for flagging this item!"). While the "javascript toggle" display option is the quickest way to flag items, there might be some cases where a normal (full page refresh) link or a confirmation message are necessary. Thankfully, these can be set on a per-flag basis.
Thanks to Earl Miles (merlinofchaos), Nate Haug (quicksketch), and Mooffie for their great work on this module. Let me know of the cool ways your site is using the Flag module in the comments below.
Comments
Pingback
[...] [email protected] (Ryan Price) put an intriguing blog post on Capture (the power of) the Flag (module) | DrupalEasyHere’s a quick excerptThe updated and renamed module is a breath of fresh air - it is an ease to install and configure for any number of use cases - in this article, I’ll demonstrate how you can set up a list of the best comments on your site. … When you first install and enable the module, the first thing you’ll notice is that there’s a new “Flag” option in the Administer|Site Building menu. This is the main control panel for your flags. The Flag module allows to you define an unlimited … [...]
If you want to (drag'n'drop)
If you want to (drag'n'drop) reorder your Flags, consider the Flag Weights module, along with the Draggable Views module.
It also has rules
It also has rules integration, which is similar to the actions stuff but more powerful. Check it out by installing the rules module..