Ubercart is arguably the leading ecommerce module suite for Drupal. It allows site admins to sell virtually just about anything online, including physical products, downloadable products, and event admissions. Often, when selling event admissions, it is desirable for the registrant to be able to fill out a profile during the checkout process that can be posted on the site once the transaction is complete. The UC Node Checkout module was built for this purpose. This is the way last year's Do It With Drupal conference handled registrations - with these exact modules.
Setting it up can be a little tricky, as it is not entirely a straight-forward process. Ryan Szrama, the de-facto leader of the Ubercart project, demoed this module during the recent DrupalCon DC. I thought I'd take the time to reproduce what Ryan did, as it is a great introduction to this module. Keep in mind it won't be an exact reproduction, but it should be pretty close.
This article will assume you're familiar with some very basic Ubercart concepts, if you're not, don't worry, this isn't rocket science. One thing you'll need to do if you're playing along at home is to create the "keys" directory for test credit card payments - full info on this is located at admin/store/settings/payment/edit/methods in your Drupal install (assuming you already have Ubercart enabled).
To begin, you're going to want to make sure you have the following modules installed and enabled (in addition to the default Drupal core modules that are enabled on a fresh install):
- Admin Menu (not required for this tutorial, but some of the screen shots below use it)
- Content
- Content: Number
- Path
- Token
- All of the core Ubercart modules (6.x-2.0-beta5 or later!)
- Ubercart: Catalog
- Ubercart: Payment
- Node Checkout
- Ubercart: Credit Card
- Ubercart: Test Gateway
- Views
- Views UI
The first thing you'll need to do is to set up a Product Class for Events under Administer|Store Administration|Products|Manage Classes (admin/store/products/classes):
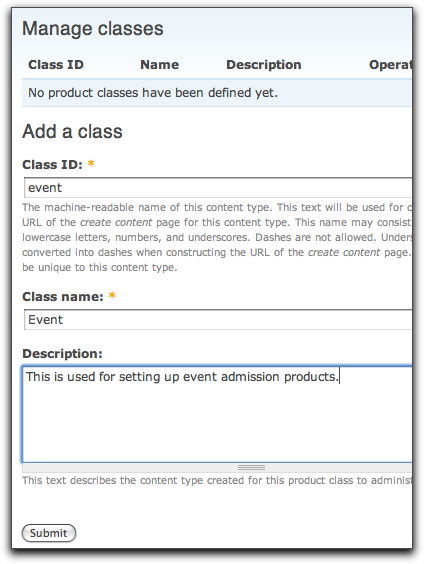
We're going to keep things simple and not add an event date field - I'm only going to add fields that are relevant for this tutorial.
The next step is to set up a content type for the registrant profile. This is the information that you want each event registrant to fill out during the checkout process when they are purchasing an admission to the event. Go ahead and create a new content type (admin/content/types/add) with the following settings:
- Name
- Registrant Profile
- Type
- registrant_profile
- Title field label
- Name
- Body field label
- Bio
- Default comment settings
- Disabled
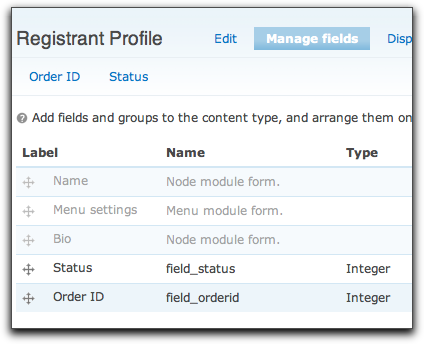
Then, you need to add a few fields to the new "Registrant Profile" content type. I'm going to be adding 2 fields to the content type - both will be hidden to the user, but you'll be using them behind the scenes to add some additional functionality. Go to the "edit registrant profile content type" page (admin/content/node-type/registrant-profile) and add 2 text fields:
- Label
- Status
- Field Name
- field_status
- Type of data to store
- Integer
- Form element to edit the data
- Text field
- Label
- Order ID
- Field Name
- field_orderid
- Type of data to store
- Integer
- Form element to edit the data
- Text field
The default values for each fields configuration settings don't need to be touched. Here's what the completed registrant profile content type should look like:
You're also going to want to go to your user permissions page and allow both anonymous and authorized users the "create registrant_profile content" permissions.
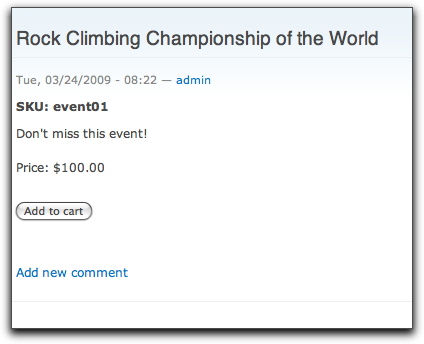
At this point, you have the necessary content types set up, the next step is to create an event product, and associate it with the registrant profile. Click on the "create content" menu item and select "event" as the content you'd like to create. Again, we really only need to fill out the required fields, the rest of the fields are fine the way they are.
- Name
- Rock Climbing Championship of the World
- Description
- Don't miss this event!
- SKU
- event01
- Sell Price
- 100
- Product and its derivatives are shippable.
- not checked
Next, you need to link the registrant profile with this event using the UC Node Checkout settings. Take note of the node ID of the event - assuming that the Pathauto module is not enabled, you can find the node ID in the URL of the event page - it should look something like this:
http://localhost/your-drupal-directory/node/1
In my case, since I'm using a fresh install of Drupal, the node ID of my Rock Climbing event is 1. Then, navigate to the UC Node Checkout settings via the Administration Menu:
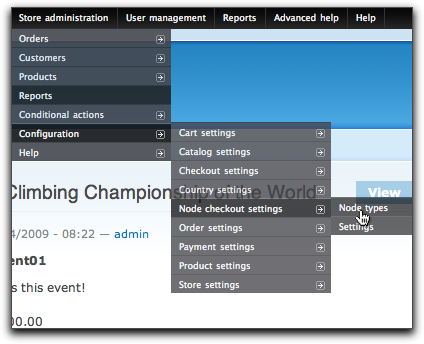
I want to associate the "Registrant Profile" content type with the "Rock Climbing Championship of the World" event I just created. This will force attendees of the event to fill out a registrant profile during the checkout process. Click the "edit" link for the Registrant Profile.
The "Product NID" is the node ID of your event - in my case, it is equal to 1. I also made both the "Status" and "Order ID" fields "restricted" - this will hide the fields from public view.
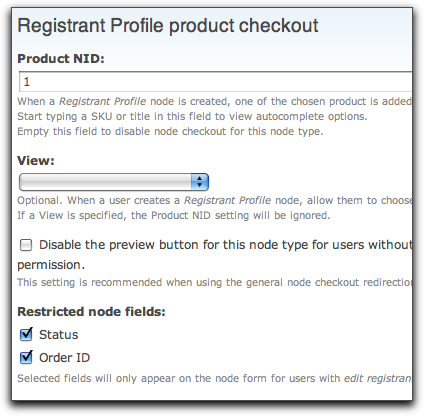
You should also take a quick peek at the admin/store/settings/node-checkout/settings page - there is one setting in particular that you should pay attention to - the "Use UC Node Checkout to prevent anonymous node add access for node types it governs" - when checked, this makes it so anonymous users can't create the associated node ("registrant profile" in our case), only logged in users can - regardless of Ubercart's anonymous checkout settings. Go ahead and uncheck this box for this example to allow anonymous users to complete a registrant profile. Be warned that it will also expose a create "registrant profile" link in the "create content" menu that you may want to disable in the future.
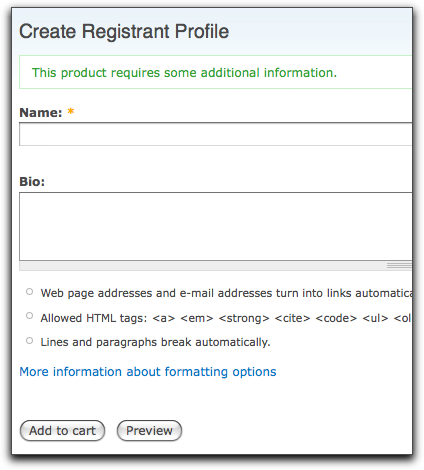
At this point, we actually have a semi-working system. Go ahead and log out as admin, then navigate to your event product and click to add it to your cart. You'll see that you're immediately directed to a blank "registrant profile" page that you're required to fill out prior to checkout. Be sure to notice that the "Status" and "Order ID" fields are not visible.
There's still one major flaw in the system - if a user completes the "registrant profile" form, but failed to complete the checkout, you'll end up with an orphaned registrant profile page - we need some way to mark a registrant profile page as paid. This is what we're going to use the "Status" and "Order ID" fields for. We'll use Ubercart's Conditional Actions to add a bit of PHP code to update the fields when the user completes the checkout process.
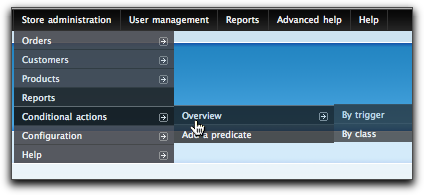
A conditional action is simply something that takes place when a certain condition is met. In our case, the trigger is going to be "customer completes checkout", the condition is going to be that the customer is ordering our "Rock Climbing Championship of the World" product, and the action is going to be our custom PHP code to update the "Status" and "Order ID" fields. Go ahead and click to "Add a predicate" from Ubercart's Conditional Actions page.
- Title
- Update registrant profile
- Trigger
- Custom completes checkout
Next, we want to add the condition. This page can be a little tricky - be careful about which buttons you're clicking here, I've gotten into trouble more than once on this page.
Under "available conditions", select "Check and order's products", then click "Add condition". Then, fill out the form as follows:
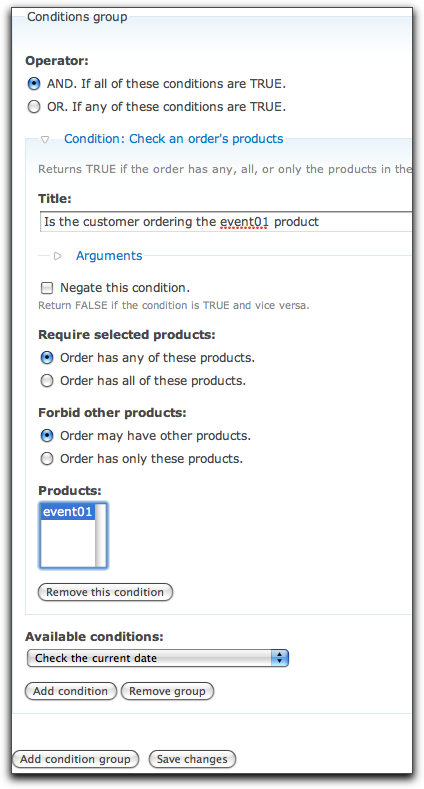
When finished, click "Save changes". Then click the "Actions" tab and select "Execute Custom PHP code" (this is where it is required that you're using Ubercart 6.x-2.0-beta5 or later) and click the "Add Action" button. Change the "Title" to "Update custom fields" and enter the following PHP code:
if (isset($order)) {
  foreach ($order->products as $product) {
    if (isset($product->data['node_checkout_nid'])) {
      $node = node_load($product->data['node_checkout_nid']);
      $node->field_status['0']['value'] = 1;
      $node->field_orderid['0']['value'] = $order->order_id;
      node_save($node);
    }
  }
}
When complete, click the "Save changes" button. As you can see, the code simply checks for the existence of the $order object, then loops around all of its products, when it finds one that includes a "node_checkout_nid" (from the UC Node Checkout module), it loads it and updates the "Status" and "Order ID" fields.
Once the order is complete, log back in as the site admin, and view the registrant profile node - you'll see the updated fields. You might also want to try repeating the process, but abandoning the cart to see the difference.
At this point, you can create a view to show the registrant profiles for customers who have completed their checkout as well as a listing of those who have abandoned their checkout. I'm not going to go through the process of creating the views here, but I've attached them (along with the "event" and "registrant_profile" content types) to this article.
That should do it - you now should have a fully-functional event registration system that exposes registrant profile information as fully functional nodes that you can bend to your will using any number of modules. Go forth and sell!
NOTE: One of our readers, Ron, noted: Using "checkout complete" as the trigger to update the published status of items is not safe for all payment methods. For example, when this is applied against checks or cash on delivery it allows anons to fully publish nodes regardless of whether they have paid since Ubercart still views those methods as having completed the checkout process. The fix is to move the status change to the payment completed condition which makes sure the user has actually paid for something before publish nodes.
Comments
I've been working with
I've been working with uc_node_checkout for the past couple weeks in setting up a class registration system, and one thing I've run into is an issue with it where the user is not redirected back to the node_checkout node create page after creating a new account (in our use case, we don't want anonymous users to be able to purchase the node). I've posted details in the issue queue and even asked on the development list, but I haven't been able to find a good workaround yet. Do you guys have a suggestion of how to get around this situation?
Thanks.
Have you considered using
Have you considered using hook_form_alter(); to change the redirection for the form in the specific use case?
That's exactly what the
That's exactly what the module is already doing. It's storing the current URL in a $_SESSION variable, and after redirecting the user, when the login screen comes up, it was using hook_form_alter() to retrieve the stored URL and modify $form['#redirect']. The problem is that the $_SESSION variables are wiped out at the end of drupal_goto(), so the one that is being set is not there any more when the user is done creating a new account.
Hey, I followed these
Hey, I followed these instructions to the tee and for some reason when any type of user clicks add to cart on the event's node page, they're taken to the cart instead of the registrant profile form. I've got registrant profile content creation permissions for everybody and the registrant profile node type is pointing at the event node type under the uc_node_checkout settings page. What else am I missing??? Im using a D5 install, could that be to blame?
thanks a lot.
Sincerely desperate,
Fernando
Fernando, The code I showed
Fernando,
The code I showed was for Drupal 6 - I'm not sure what the outcome would be for Drupal 5, but it wouldn't surprise me if it didn't work without some modifications...
-mike
Hey Mike thx for the reply. I
Hey Mike thx for the reply. I actually only got to the part where you say: "At this point, we actually have a semi-working system. Go ahead and log out as admin, then navigate to your event product and click to add it to your cart. . . "
I then tested it out and found that i wasnt getting redirected to the registrant profile creation form and stopped there. Is it likely that the steps prior to this could somehow not apply correctly to a D5 install?
Let me know.
thx again
F
Fernando, I haven't actually
Fernando,
I haven't actually used the D5 version, so I don't know if the D6 version is a straight port of it or a rewrite.
Did you check the issue queue to see if anyone else has seen similar behavior?
-mike
Mike, awesome job. Thanks so
Mike, awesome job. Thanks so much for turning this into a tutorial. It's at the top of my list for coverage on CommerceGuys.com, but you know what they say about the cobbler's kids...
Anyways, the whole View association is brand new with the D6 version, so people on D5 will only be able to associate a node type with a single product. I don't intend to backport this functionality.
Great tutorial! I have a
Great tutorial! I have a question though. Do you know if it's possible to change the "Add to cart" text based on the product class? I think it would be nice for the button to say "Register" when dealing with the first step of event registration.
Phillip, I'm sure it can be
Phillip,
I'm sure it can be done, but I haven't looked into exactly what the best way of doing it is. I would guess that you could probably do it using the String Overrides module (http://drupal.org/project/stringoverrides).
If that doesn't work, try searching on the Ubercart forums (http://www.ubercart.org/forum).
-mike
Hi Drupal and UC newb
Hi Drupal and UC newb here,
could you be a little more clear about which modules need to be installed? For example there is no module called "Admin Menu" There is Administration Menu, is that the same thing? There are 15 different modules that start with the name "content" and so on.
I'm setting up a registration cart in Drupal using Ubercart and this would be the perfect walk though with a little clarification.
Thanks!
Here are the links to the
Here are the links to the modules I listed in the post above.
Some of these modules are actually collections of modules. For example, the ubercart download listed below actually contains over a dozen separate modules (shipping, payment, etc...)
http://www.drupal.org/project/administration_menu
http://www.drupal.org/project/cck
http://www.drupal.org/project/token
http://www.drupal.org/project/ubercart
http://www.drupal.org/project/uc_node_checkout
http://www.drupal.org/project/views
-mike
very clear walk though thank
very clear walk though
thank you
worked first time using D6 UC2.
[5 stars :]
I do have a question, almost related. Taken that I used the above settings and node elements. And EVENT was £10.00. I would really like to be able to adjust the price of the event in the profile registration form, using a drop down. for some thing like amount of people or a discount, is this possible at this stage ? where would i find documentation on the kinds of hooks I'd need to use ? I Know I can use attributes in the event product node to change the price, but the user doesn't actually create and event, they create a profile and this is where is I want to store my data, so that you can list all nodes of profile type created by user and the attributes there of. Hope that makes sense. If you could create a node and buy it all at once that would be perfect, infact that's what i though this module did but actually you create a product and associate it with a node type, which makes a lot more sense really. Any leads appreciated, Thanks again for the great walkthrough.
Jowan, You'll probably have
Jowan,
You'll probably have to write a custom module for something like this - I would start by looking at Ubercart's "hook_order()":
http://www.ubercart.org/docs/api/hook_order
-mike
thanks for lead, i shall
thanks for lead, i shall persue, cheerio
Thanks Mike for providing
Thanks Mike for providing this solution. I have some questions if you don't mind answering.
When a customer abandons their cart is it correct that their rego-profile has a blank ID and Status.
Also how would you suggest besides redoing the process manually, that the abandoned profile can add the product again without the new profile screen displaying, yet associating the paid order id and status with it?
Finally due to my lack of experience with the modules how can I display the field status in my view as from "Status: 1" to Status: Paid or registered. I ask this in case I need to swap the field_status with text instead of an integer (therefore affect your php action code).
Thanks Again
Steve, Good questions, all of
Steve,
Good questions, all of them. It'll take me a few days before I can get back to you on these...
-mike
Steve, Thanks for your
Steve,
Thanks for your patience. To answer your questions...
1. Yes, if a customer abandons their purchase after filling out the "rego-profile", the "status" and "order ID" field will be blank (or set to their default value if one was used when setting up the "rego-profile" content type).
2. To re-use the abandoned profile, you should be able to create a custom module and use hook_form_alter to check to see if the user already has a "rego-profile" created, then redirect the user to the edit page for their profile (assuming you have your site's permissions set up to allowed users to edit their own "rego-profile" content).
3. As far as how to display "Status: Paid" instead of "Status: 1" - there's a couple of way to do that. One way would be to change the "status" CCK widget to a select list and enter in the options as "0|Not Paid" and "1|Paid" - this would require some tinkering with the conditional action code to be sure it gets set correctly. Another way of doing it would be to leave the CCK widget alone, then just change the display of the value using either theming or a CCK display widget - both which would require some additional code.
-mike
I followed these tutorial,
I followed these tutorial, and bring it to work in Drupal 5. Thank for help.
Hi Mike, I am having a bit of
Hi Mike,
I am having a bit of trouble with node checkout. The problem is that the user is not redirected to the associated node. I am using D6 and followed your tutorial a number of times. I also had a look on the documentation on drupal.org and the mentioned the following:
http://drupal.org/node/339099 -
"You should consider unpublishing this product and linking customers directly to the node add form or altering the add to cart form for this product so that it directs the customer to the node add form instead of adding the product to the cart."
This wasn't mentioned in your tutorial and any help would be much appreciated.
Thanks
Rob
Please ignore the above
Please ignore the above message. I tested node checkout out on another installation and it worked perfectly. I then got it work on the original installation by disabling the UC Ajax cart module.
Thanks Mike for looking at
Thanks Mike for looking at those questions - having little php skills can you point me to some code that can help me with answer #2 - I can create the hook form module but the code for it has me baffled eg checking the user has created a rego-profile and sending them to the edit form.
Id appreciate any help thnaks.
stevek
Steve, The pseudo-code for
Steve,
The pseudo-code for hook_form_alter() would look something like this:
if the registration form is being displayed

  get the current user's id

  search the node table for a node of type "rego-profile" where the uid is the same as the current user's id

  if the node exists, send the user to its edit page using drupal_goto()

  else do nothing
This is assuming that the user making the purchase is logged into your site. If not, then you'll need to create a new form to grab their email or some other identifying information and use that to search for the node. This would involve a lot more custom code.
-mike
I have a site with members
I have a site with members and there a multiple of events. for now they are all of the same nodetype.
how do I use this to allow logged in users to skip the registration form or have it pre-filled and have it only show up for anonymous users?
Thanks,
Chris
Chris, You'll have to write
Chris,
You'll have to write some custom code - most likely utilizing hook_form_alter() to figure out if they're logged in and/or to pre-fill their values.
-mike
will I still be able to
will I still be able to create a user profile if I use node checkout?
Can I make the registration a content profile?
Can I have the first page just be the user registration page? This would save some time.
Guest (pretty sure that's not
Guest (pretty sure that's not your real name),
Yes, you can still create a user profile.
Yes, I don't see any reason why you couldn't make the registration also the user profile.
I'm not sure if you can set the home page to be the user registration page - I think you might be able to do it using the "cart links" capabilities in Ubercart. Give it a try and let us know.
Thanks,
-mike
Great tutorial and much
Great tutorial and much appreciated!
Am I missing something simple? Trying to add an option to purchase a 1 or 2 day pass w/ differing prices.
Attributes and options are done ... but not appearing on the registration(node create) form.
Any ideas?
Also, not as important but also wanting to change the price of each attribute depending on whether or not the user is anonymous or verified.
Regarding the above, it's
Regarding the above, it's easy to get your attibutes/option/products mixed up like I did.
I had to re-do the attributes for the newly created node-type. Thanks!
Still wondering the best approach to alter the price for "anonymous" users vs. registered users.
Perhaps the custom price module ...
I used the instructions. i
I used the instructions.
i get the registration profile
When I click add to cart, i am taken to the registration profile that I just created and not the cart.
Now I did change the tutorial a little after hearing the video. I used a view instead of a product id to associate.
I followed the instructions about CA but I don't know what I am doing wrong.
Thanks,
Chris
Great tutorial, and works as
Great tutorial, and works as advertised - very impressed.
I then created a new event (node/2) and went to admin/store/settings/node-checkout to associate with registrant profile. I then realised that I could only associate it with EITHER node/1 or node/2. I am obviously missing how youy use this system to rum/manage multiple events on the same site .... so close - I can taste it!!
just extra feedback I put my homepage in but forgot the http:// and it didnt accept it so I had to add it as a prefix - this may be what was intended but just fyi
Hi, thx for the tutorial. One
Hi,
thx for the tutorial. One question. . . Im trying to figure out a way to send bulk reminder emails to event registrants before the event. Do you have any ideas on how to be able to send bulk emails to the email addresses I obtain from the registrant profile information ?
Thanks a bunch!
Fernando
Fernando, I don't think
Fernando,
I don't think there's anything that will do that automatically without a little bit of setup. There might be a way to do it automatically using the excellent SimpleNews module (http://www.drupal.org/project/simplenews), but it's not something I know how to do off the top of my head.
Maybe Ubercart Conditional Actions could help as well (in order to automatically subscribe purchases to a newsletter?)
Thanks,
-mike
Fernando, Views bulk
Fernando,
Views bulk operations has send tokenized e-mails I've set up my view to include this operation as i needed to do the same thing.
SteveK
Steve, Hmm thx a lot. I knew
Steve,
Hmm thx a lot. I knew about views bulk operations but not about the token support. Im gonna look into it for sure.
thx again,
Fernan
Joe, You can associate an
Joe,
You can associate an associated content type with either a specific node or a view of nodes. In my case, I have a bunch of Class products, and I created a Registration content type. At /admin/store/settings/node-checkout/registration, I can then associate the Registration type with the list of Classes. You can see it in action at www.myartleague.org.
Thank you so much for
Thank you so much for providing these instructions! When we use option of associating the registration content type with a view, I assume even though the end user has navigated from a product's add to cart button, on the uc node checkout screen they would need to select the product node they want to purchase. Is there a way to have it preselected with the product node that they just came from? Code snippets much appreciated if someone has already done this, thanks!
No, that's not true.
No, that's not true. uc_node_checkout maintains the connection between the original product and associated registration content type node in the uc_node_checkout_order_product table in the database. However, the module has not provided a Views relationship so that you can easily provide a listing of products and their associated uc_node_checkout nodes. I took a shot at it at http://drupal.org/node/430016, but I made an incorrect assumption about how tables are linked in the database, so it needs some more work before it works correctly.
However, I did come up with a workaround for this by adding two fields to the node_checkout node form for Class Name (field_class_name) and Class ID (field_class_id, the Ubercart SKU). I then used hook_form_alter() to automatically fill in the values for these fields.
function mymodule_form_alter(&$form, &$form_state, $form_id) {

  switch ($form_id) {

    case 'registration_node_form':

      if (arg(1) == 'add') {

        $product_nid = $_GET['product_nid'];

        $class = node_load($product_nid);

        $class_name = $class->title;

        $form['group_class_information']['field_class_name'][0]['#default_value']['value'] = $class_name;
//get SKU based on class nid
$sku_query = 'SELECT model from uc_products where nid = %d';
$sku = db_result(db_query($sku_query,$product_nid));
$form['group_class_information']['field_class_id'][0]['#default_value']['value'] = $sku;
break;
}
So in my case, when the user chooses a Class and clicks Add to Cart, they go to the Registration form, and the Class Name and Class ID fields are automatically filled in for them. Then, I can use those fields in a View and group by Class Name or Class ID.
Thanks! Clarification, did
Thanks! Clarification, did you use the patch and .inc file from post #4 from the issue queue you linked to, *along* with this code or just the code snippet here, and is this code a function override to be put in template.php (confused by the function named "mymodule"_form_alter) or it's own module (excuse my programing level, expertise is front end devel). I appreciate you time!
My whole incentive for this
My whole incentive for this is so the client will only have to create a new product but not have to create a different uc node checkout content type each time, but the same registration content type can be used for multiple products (in this case they are selling trainings). Sorry for multiple posts.
No, the patch (a Views
No, the patch (a Views relationship) didn't work, so it can't be used yet. I just added the two fields (field_class_name and field_class_id) to my Registration content type, and then put the snippet above in a module. It is an implementation of a hook (see the hook documentation), in this case hook_form_alter(). This hook allows you to modify the contents of a form when it is displayed. With any hook, you replace the word "hook" with the name of your module, hence the name module_form_alter().
I've got this completely
I've got this completely working for a checkout registration node associated with a product class view (difference being I'm using text not integers for status + order fields, like in demo.ubercart.org). So now needing to have a view to display registration lists per training (my product nodes). I now understand and have implemented Steve's module code from post #38, but it is not writing anything to these fields. Help appreciated!
Nevermind, I had failed to
Nevermind, I had failed to adjust the code to completely match my fields and it's working, thanks for the code, Steve!
This tutorial was exactly
This tutorial was exactly what I was looking for! I've got one little thing I'm trying to tack onto the top of it though. For our event, customers can register to play golf and if needed, rent clubs. I have fields defined for these two items in registrant content type and I'd like for them to be updated when the customer checks out based on whether they registered for golf/clubs or not. Here's the code I'm using right now:
if (isset($order)) {foreach ($order->products as $product) {
if (isset($product->data['node_checkout_nid'])) {
$node = node_load($product->data['node_checkout_nid']);
$node->field_status['0']['value'] = 1;
$node->field_orderid['0']['value'] = $order->order_id;
$node->field_golfing['0']['value'] = 1;
$node->field_renting_clubs['0']['value'] = 1;
node_save($node);
}
It's the code you provided and I tacked on field_golfing and field_renting_clubs. As of right now, even if someone registers for golf OR not, the value updates as "1" (what I want to represent "yes") so I end up having to go back and change it to "0" for everyone who doesn't register for golf. I understand what's happening, I just don't know how to get the fields to update if based on what someone registers for. Any ideas?
Thanks!
Try looking at the $product
Try looking at the $product variable to figure out how to grab the correct value for field_golfing and field_renting_clubs.
-mike
Hi! I've created an event
Hi! I've created an event registration site using this great tutorial. However I need a way to list these participants that includes the registrant profile data but that ALSO includes internal fields from ubercart such as "shipping address", "payment method", "total paid" etc. I've been searching high and low for a contrib mod. that might help with this but no luck.
Any suggestions would be hugely appreciated.
Fernan
Hello, I've been working for
Hello,
I've been working for days with node_checkout module and it's great! But i have a problem, why is it my uc_node_checkout_order_product table table is always empty? I already completed my order(marked my order as completed), I trace the table from it's creation up to completing my order in paypal sandbox, still i can't see any data/rows inside my uc_node_checkout_order_product.
Anyway, I can still keep track the order id,and other stuffs(marking it's published time when the order is complete) by creating a conditional class mentioned above by ultramike. What would be your advice/suggestion on this? using hook_order or using the conditional action to interact with complete payment?
Another is can this module(node_checkout) capable of integrating multistep module(http://drupal.org/project/multistep)? What i'd like to do is the FINAL SUBMIT button is redirected to the cart form. I have some trouble with custom destination module and form['#redirect'] with multistep, they don't redirect
To sum-up my questions:
1. Why is it my uc_node_checkout_order_product table table is always empty?
2. What would be your advice/suggestion on this? using hook_order or using the conditional action to interact with complete payment?
3. Can this module(node_checkout) capable of integrating multistep module(http://drupal.org/project/multistep)?
Sorry Guys, I have so many questions...It would be great if you could help me on this! Thanks alot!!!
Arnel, As much as I like
Arnel,
As much as I like hearing my username, I must admit that "ultramike" is even cooler!
You've got some in-depth questions there - hard to answer them without learning more about your particular situation and spending some time on it.
Email us via our contact form and we'll see what we can do.
Thanks,
-mike