At Florida DrupalCamp 2013, I presented a session (video included) that demonstrated how to utilize the Feeds, Feeds Tamper, Address field, Geofield, and other modules to create a fully-functional website for searching for Farmers Markets anywhere in the United States. While the session's intent was to inspire people as to what Drupal can do in a very short amount of time, this blog post will focus on the details of the process.
A few years ago, I built a similar presentation using world-wide earthquake data, importing into a Drupal 6 site using Table Wizard and displaying the data using the Mapstraction module. I must have given that presentation about half-a-dozen times over the course of a year or so at various meetups and camps, so I thought now was a good time to bring it up-to-date with modern (relatively-speaking) Drupal tools.

The Farmers Markets Source Data
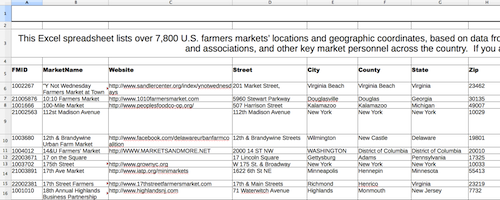
- Removed the top 3 descriptive header rows. For the import, all we actually need is a column/field name header row and the data. Any anciliary header rows need to be removed.
- Removed the bottom 2 descriptive footer rows. For this dataset, there was a row at the bottom of the dataset that contained information about when the dataset was last updated. This wasn't needed for the import, so I manually deleted it.
Additionally, I took note of the following things:
- The FMID field (I'm assuming this is an acronym for "farmers market identifier") appears to be a unique integer for each record in the dataset. This will come in handy during import.
- There was no "country" field. This isn't unexpected since this was data for United States' farmers markets, but I did take note of it because the Address Field module will be looking for country data. I could have simply added a new "country" field (with all values set to "United States") to the dataset prior to exporting it as a .csv file, but I prefer to keep the dataset as "pure" as possible, so I decided to leave it alone for now and deal with the country stuff as part of the import process (see below).
- The data in the "State" column included full state names, not the standard 2-letter abbreviations. I knew that this would need some tampering (via the Feeds Tamper) module to convert it so that it would import cleanly.
- The "Schedule" field for some records is longer than 255 characters. This means that we'll have to use a "Long text" field type in the content type to handle the data in this field.
- The data also included 20 "category"-type fields indicating the types of goods available at each farmer's market (eggs, cheese, soap, trees, etc...) Ideally, each of these 20 fields should be mapped to a single Drupal vocabulary. This would require a custom Feeds Tamper plugin.
- The "lastUpdated" field mostly contains well-formatted dates, but because there are some records where the data is not well-formatted ("2009" instead of "mm/dd/yyyy") and it is just informational, its probably best just to use a text field in the content type for this data.
Once I was satisfied that the data was clean and I had a good understanding of it, I saved it as a .csv file and moved onto getting Drupal ready to import it.
Setting Up the Basic Site
As with most of the sites DrupalEasy builds, we started out with our own custom Drush make file that automatically downloads a bunch of standardish modules we use on every site as well as our own custom installation profile that does some initial site configuration (turning off the Overlay, enabling the Administration Menu module, etc...) This enables us to get a basic site up-and-running in just a few mintues.
Next, we need to download and enable the modules that we're going to need:
- Address Field
- Feeds
- Feeds Tamper
- Geofield - be sure to use a version of the 7.x-2.x branch dated later than 2013-Apr-07
- Job Scheduler
- geoPHP
- Rules
- OpenLayers
Depending on whether or not you start with our custom make file, there may be other modules that are dependencies of the ones listed above that will also need to be downloaded and enabled.
If you use Drush, the following command will enable all the necessary modules:
drush en addressfield feeds_ui feeds_tamper_ui geofield
geofield_map job_scheduler feeds geophp rules_admin openlayers_ui
Creating the Farmers Market Content Type
Once the site is up-and-running, the first step is to set up something for all of the data to be imported into. In this case, hopefully it is obvious that we need to create a new content type with fields that roughly match the fields in our source file. By creating a node for each Farmers Market, once imported we can leverage all of the tools in the Drupal universe to interact with them as we build out the site.
Create a new content type (admin/structure/types/add) with the following properties (throughout this post, any properties/attributes/settings not specifically mentioned can be left at their default values):
- Name: Farmers Market
- Disable "Promoted to front page"
- Disable "Main menu" from "Available menus"
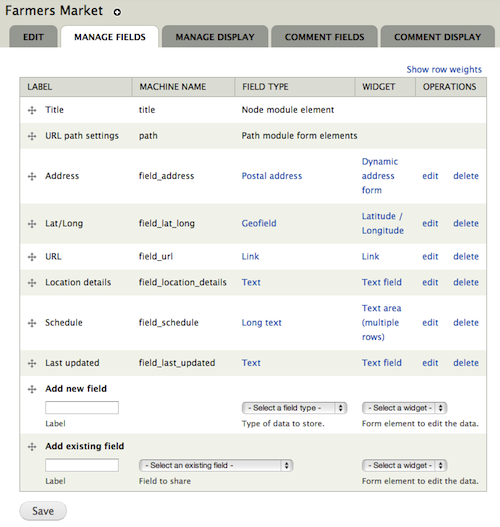
Moving on to the fields (admin/structure/types/manage/farmers-market/fields):
- Delete the "Body" field
- Add "Address" field: type=Postal Address, Available countries=United States, enable "Hide the country when only one is available"
- Add "Lat/Long" field: type=Geofield, Widget=Latitude/Longitude
- Add "URL" field: type=Link, Link Title=No Title
- Add "Location details" field: type=Text
- Add "Schedule" field: type=Long text
- Add "Last updated" field: type=Text
One thing to note is that once the import is complete, we're going to go ahead and enable the Geocoder module so that any Drupal-side address updates to any Farmers Market nodes will be automatically updated with the proper latitude/longitude coordinates. We don't want to enable this functionality prior to import otherwise the module will attempt to geocode each address from the source file during import. This is completely unecessary since the source file already includes latitude/longitude data. Plus, Google Geocoder limits non-paid users to 2,500 requests per day - unless you pay for more.
Creating the Importer
At this point, we have the source data (the .csv file) and the destination (the "Farmers Market" content type). The next step is to create the mechanism that will actually transfer the data from the source to the destination. We'll use the Feeds module to do this. The Feeds module is designed to take data from a variety of sources (most commonly RSS feeds and .csv files) and map it to Drupal entities (usually nodes, but not always).
Add a new importer (admin/structure/feeds) named "Farmers Markets Importer". The "Edit" page for importers has 4 major sections. Let's look at each one in detail.
Basic settings
This section consists of the general configuration of the importer. For this project, use the following settings:
- Attach to content type = Use standalone form. Note that this isn't referring to were the content is going to go, it is referring to the importer itself. In our case, since we only have a single data source, a standalone form is fine. If were were planning on importing data from multiple sources, a custom importer content type might be necessary.
- Periodic import = Off. This setting is primarily used for automatically checking a feed for new data. For a one-time .csv import, it is not necessary.
- Import on submission = Enabled. This triggers the import to start whenever a new .csv file is uploaded on the main import (/import) page.
Fetcher
This section sets the mechanism that actually interacts with the source data. We need to change the Fetcher from "HTTP Fetcher" (commonly used for RSS feeds) to "File upload". Looking at the settings for the "File upload" fetcher, all the default values are fine, so no changes are necessary.
Parser
This section sets the process that will be used to parse the source data into a format that the "Processor" (next step) can understand. In our case, we need to change the Parser from "Common Syndication parser" to "CSV parser". Again, the default settings for the "CSV parser" are fine as-is. It is interesting to note that the Feeds module is easily extensible. Custom Fetchers, Parsers, and Processors can be written to handle virtually any type of incoming data.
Processor
This final section is were the parsed source data is mapped to the proper place in Drupal. In our case, the default "Node processor" is what we want (since we're mapping the data into our new "Farmers Market" content type). The settings for the Node processor are as follows:
- Update existing nodes = Update existing nodes (slower than replacing them). This is a big win for us, and is only possible because of the FMID field in the source data. This means that when an updated source dataset is available, (assuming the field structure hasn't changed) we can simply re-run our importer on the new file and upload only the records that have changed. In other words, we won't have to delete (including any user comments and Drupal-side updates) and re-import Farmers Market nodes. This will allow us to keep the site up-to-date with a minimum of work.
- Content type = Farmers Market. This is where we tell the importer that we're going to be generating nodes of the Farmers Market content type with the imported records. This is the first link between the source and destination.
- Author = admin (or any user on your site). It's fine to leave it as "anonymous", but I'd rather have my nodes "owned" by an actual user.
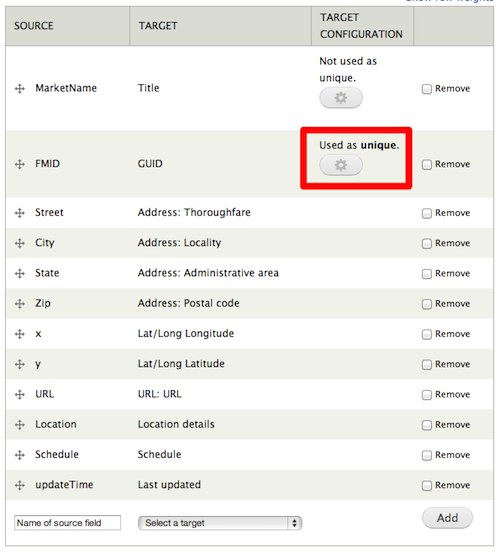
The final (and most tedious) step is to set up the mapping of fields between the source and destination. In other words: data from each source fields needs to know which destination field it will go into. It is important to note here that the source field names must be entered exactly as they appear in the source data file. The mappings for this importer are (Source = Target):
- MarketName = Title
- FMID = GUID - set this field to "Unique" then be sure to click to "Save" the mapping.
- Street = Address: Thoroughfare
- City = Address: Locality
- State = Address: Administrative area
- Zip = Address: Postal code
- x = Lat/Long Longitude
- y = Lat/Long Latitude
- Website = URL: URL
- Location = Location details
- Schedule = Schedule
- updateTime = Last updated
Be sure to double-check that the "FMID" field is set to unique!
Massaging the Data
As I indicated in the "Farmers Markets Source Data" section above, there are a couple of things we need to do in order to get the dataset to import cleanly: set the default country ("United States") and translate the full state name to the 2-letter abbreviation ("New York" to "NY", for example).
Setting the Default Country
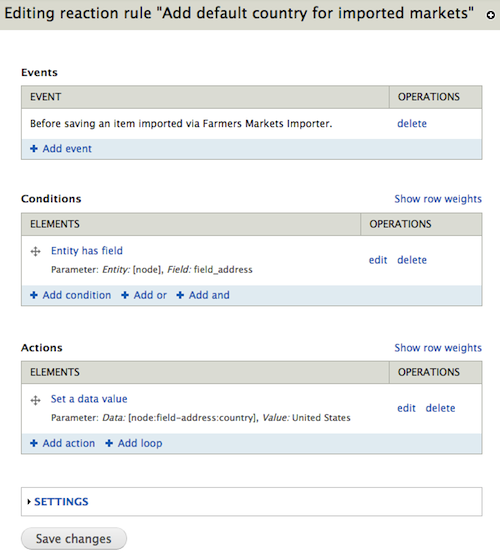
Setting the default country field for every record on import is actually a fairly simple operation to set up - assuming you're aware that the Feeds module exposes a "Before saving an item imported via [importer name]" event for each Feeds importer. This allows us to step in the middle of the import process and set a data value as we wish.
From the main Rules configuration page (admin/configure/workflow/rules), add a new rule named "Add default country for imported markets" that reacts on the "Before saving an item imported via Farmers Markets Importer" event.
Next, add an "Entity has field" condition with the Data selector=node and Field=field_address. This ensures that the country field exists (it is part of field_address) and (more importantly) is available for us to set its value in the next step.
Finally, add an "Set a data value" action with a Data selector=node:field-address:country and a Value=United States. Click to save everything it's done!
Translating the State Names
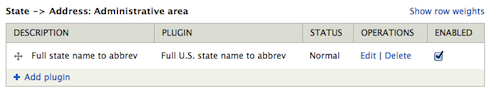
The second data issue that we need address during data import is that of the "State" field. We need a mechanism were we can automatically translate full state names into their 2-letter abbreviation. I turned to the Feeds Tamper module for this, as it is relatively straight-forward for a developer to create a custom plugin that can be assigned to any field via the Feeds Tamper interface. The source data is then run through the plugin code to make any necessary changes. Unfortunately, a plugin had to be written for this application - I have contributed it back to the community, but the module author has not acted on it as of April, 2013.
If you're not familiar with applying patches, feel free to download the state_to_abbrev_inc.zip file, uncompress it, and place it in your feeds_tamper/plugins directory.
Once the plugin is installed, it needs to be assiged to the "State" field. This is done by clicking "Tamper" link for our importer from the main "Feed importers" page (admin/structure/feeds). Then, add the "Full U.S. state name to abbrev" plugin to the " State -> Address: Administrative area" field.
Import!
At this point, everything is ready to proceed with the import. Navigate to the main "Import" page (/import) via the Navigation menu and click the "Farmers Markets Importer". Select the file to upload and click to "Import".
I like to test things with a small version of the main source file - one with only a handful of records. This is helpful in making sure everything is being imported correctly without having to wait for all 7,000+ records to be processed. I check things by inspecting a few of the newly created Farmers Market nodes, ensuring fields are populated as expected. If I'm satisfied, then I go ahead and run the import with the full data set.
On my particular local machine, importing all 7,000+ records took about 6 minutes.
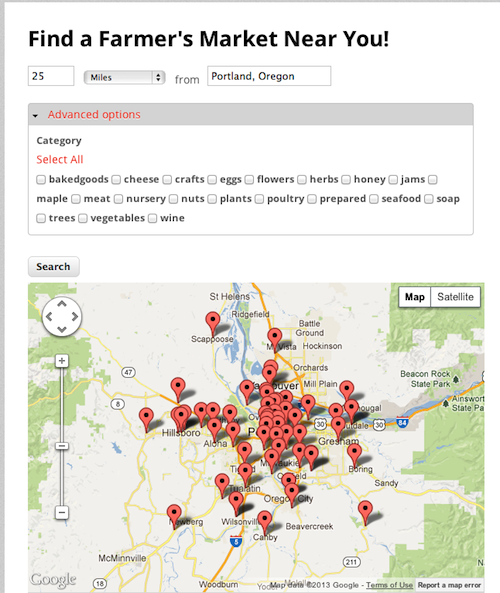
Setting Up the Proximity Search
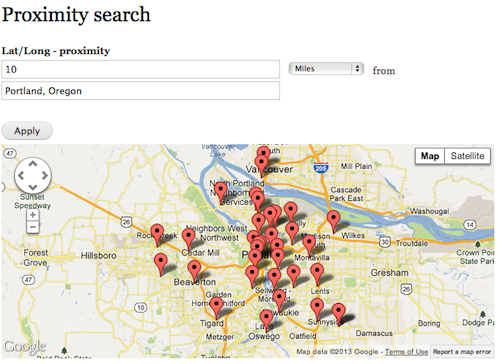
One of the features that really makes location-based content useful is proximity searches: being able to allow the user to "show me all the things near a particular location". For this example, we're going to use the built-in proximity functionality of the 7.x-2.x version of the Geofield module. We'll create a view that exposes a proximity filter that incorporates geocoding by allowing the user to enter any valid location data into the "origin" textfield. That is, the user can query for farmers markets within 10 miles of "Sacramento, CA", "06103", or "1600 Pennsylvania Ave, Washington, DC" - any text that the active Geocoder (usually Google Geocoder) can parse.

Once the import is complete, enable the Geocoder module. Then, create a new view named "Proximity search". On the initial views wizard page, "Show Content of type Farmers Market" (sorting doesn't matter yet). Create a page with a Display format" of "Geofield Map". Set the "Items to display" to 100 (just to make sure we never overwhelm the map with points), and disable the pager. On the main views interface:
- Click to add the "Content: Lat/Long" field - exclude from display, Formatter=Latitude/Longitude
- Click to add the "Content: Lat/Long - proximity" field - exclude from display, Source of Origin Point=Exposed Geofield Proximity Filter, Unit of Measure=Miles
- Click to add the "Content: Lat/Long - proximity" filter - Expose this filter to visitors, enable "Remember the last selection", Operator=Is less than or equal to, Source of Origin Point=Geocoded Location. Be sure to add a default value for the exposed filter ("10 miles from New York, NY") or you may see a nasty little bug (http://drupal.org/node/1871510)
- Remove the "Content: Post date" sort criteria
- Edit the settings of the Geofield Map format: Data source=Lat/Long, Popup Text=title
Once complete, save the view, then navigate to the /proximity-search (or whatever URL you set for the page display of the view) and give it a whirl!
Pimping the Display (and Functionality) of Farmers Market Nodes
At this point, if you click on a Farmers Market pin, then click through to a particular Farmers Market node, the display of the node is less-than-impressive.
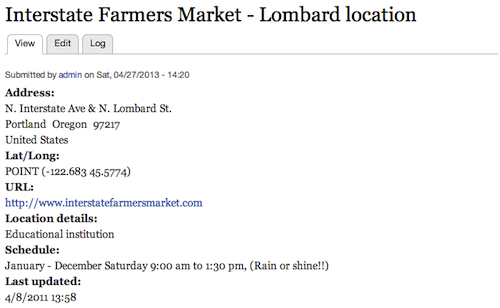
With just a little bit of effort, this can be greatly improved. We'll rearrange the order of fields, tweak the display a little bit, add a map, and incorporate Geocoder functionality for address updates.
OpenLayers Map
To keep things interesting, we're going to use the OpenLayers module for the map display on the individual Farmers Market nodes. First, we'll need to edit the OpenLayers map that we're going to utilize. Go to the main OpenLayers "Maps" page (admin/structure/openlayers/maps), and click to edit the geofield_formatter_map (the description of the map should explain why we're using this one - it is designed to handle the display of Geofield output). There's lots of available settings for each map, we'll only make a few small configuration changes:
- Basics section: Width=auto, Height=250px
- Layers and Styles section: only the "OMS Mapnik" layer should be enabled and set to default, set the styles for "Placeholder for Geofield Formatter" to "Marker Black Small"
- Behaviors section: Point Zoom Level=14
Once the map is configured, we can utilize it on the Lat/Long field of our Farmers Market content type. Go to the "Manage Display" page (admin/structure/types/manage/farmers_market/display) and change the format of the "Lat/Long" field to OpenLayers. Click to save and test.
Reordering the Display Fields
While we're on the "Manage Display" page of the Farmers Market content type, rearrange the fields as follows:
- Lat/Long: Label=Hidden
- Location details: Label=Hidden
- Address: Label=Hidden
- URL: Label=Hidden
- Schedule: Label=Inline
- Last updated: Label=Inline
With these changes, things improve quite a bit.
Enabling the Geocoder for Address Updates
Finally, now that all the data is imported, we can go back and modify the Lat/Long field to automatically be updated by the Geocoder module whenever the node is updated (in case the address changes). From the "Manage Fields" page for our content type (admin/structure/types/manage/farmers_market/fields), click the "Latitude/Longitude" widget for the "Lat/Long" field, change the widget to be "Geocode from another field", then continue to click to edit the field configuration and ensure the "Geocode from field" option is set to "Address". Click to save.
Are We Done?
At this point, we have a fully functional site where users can search for farmers markets near them, then click to view the details on ones that interest them. Since the farmers markets are nodes, we can leverage all the great modules available from Drupal.org to futher extend and enhance the site.
With just a few additional modules, a contribued (responsive) theme with just a few extra lines of CSS, and some publically available imagery, it's quite simple to produce a usable site - just like FarmersMarketsNow.com!
Extra Credit - Utilizing the Source Dataset's Category Fields
Still reading? Congrats - you're in it for the long haul. Wondering how we can leverage the category data from the source file? Here are the steps:
- Before creating the Farmers Market content type, create a new "Categories" vocabulary.
- Add a "Categories" term reference field to the Farmers Market content type and set the "Number of values" to "Unlimited".
- Install the taxonomy_inc.zip Feeds Tamper plugin in the feeds_tamper/plugins directory. This is a custom pluging that is specific to this particular source file. It takes data from all the category-type fields in the source file and imports them to the new "Categories" vocabulary.
- Add a new mapping field to the importer. The way the Feeds Tamper plugin was created, only one needs to be added. Use "Bakedgoods = Categories".
- Utilize the custom "Taxonomy Y/N" Feeds Tamper plugin on the "Bakedgoods -> Categories" field.
Rerun the import and see the magic! Note that the extra processing for the categories really slows down the import quite a bit. I'm sure that there are other ways of importing the category-type fields to a single vocabulary, let me know in the comments if you know of an easier method.
Image credit: stopwatch
Comments
This is so useful! Great
This is so useful! Great step-by-step tutorial. Thanks, Mike!
i,m having issue with this…
i,m having issue with this part the keep getting this: Data selector node:field-address: for parameter entity is invalid.
from this part of the installation instruction you provided i'm trying to figure out why it want let me choose the parameters like you got on your page here the example is very straight forward but when i try to execute it it's not working can you help me with this program i can provide you access to the site via http://www.nfttrs.com/#overlay=admin/config/workflow/rules/reaction/man… i really need your help o that part for some reason it will not work.
From the main Rules configuration page (admin/configure/workflow/rules), add a new rule named "Add default country for imported markets" that reacts on the "Before saving an item imported via Farmers Markets Importer" event.
Next, add an "Entity has field" condition with the Data selector=node and Field=field_address. This ensures that the country field exists (it is part of field_address) and (more importantly) is available for us to set its value in the next step.
Finally, add an "Set a data value" action with a Data selector=node:field-address:country and a Value=United States. Click to save everything it's done.
Data selector node:field-address: for parameter entity is invalid.
ENTITY
Specifies the entity for which to evaluate the condition.
Data selector *
node:field-address:
No search results.
The data selector helps you drill down into the data available to Rules. To make entity fields appear in the data selector, you may have to use the condition 'entity has field' (or 'content is of type'). More useful tips about data selection is available in the online documentation.
Data types: Select data of the type Any entity.
Mike, I'm trying to follow
Mike, I'm trying to follow your tutorial and was doing fine until I tried to define the first view of the markets (proximity search). I can add the field Lat/Long fine but I'll be darned if I can find the Lat/Long - Proximity field anywhere. My content type matches and the mapping appears to be fine but if I try to add fields to the view, the only thing regarding Lat/Long is just that, Lat/Long. There is no filter for Lat/Long - Proximity either. I'm new so I'm sure this is something I'm doing terribly wrong and if it's too complex to try to explain I certainly understand. Thanks, Paul
Mike, I'm really sorry, like
Mike, I'm really sorry, like I said, I'm new to this. I found my mistake, version of the geofield module. installed new version and I'm moving along now, sorry to have spoken too quickly. Thanks for your tutorial, maybe you could write another on paying better attention! Paul
Paul - glad you found your
Paul - glad you found your mistake and that it is working out for you!
-mike
Mike, thanks for taking the
Mike, thanks for taking the time to do this, I was able to get some other data imported based upon this tutorial. One thing tho I'm trying to figure out is when I go to edit a node that the address fields do not have the info listed in them. I would of figured I would of seen street, country, etc all pre-populated with whats in the node but they are empty.. any thoughts?
Steve, Sounds like the
Steve,
Sounds like the location data didn't get imported. Check to make sure that you have the "country" field set correctly.
-mike